Home DIY Projects in Under an Hour... That You Can Be Proud Of
  • Home
    • About
    • Contact
  • EZ Wall Art & Decor
  • EZ Organization
  • EZ Furniture Makeovers
  • EZ Outdoor Living
  • FREE Home DIY
  • EZ Dog Home DIY
  • Blog

DIY Tutorial for Unique Frame Matting Ideas

3/24/2023

0 Comments

 
Picture
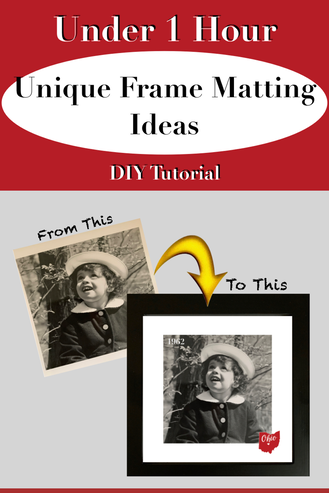
Do you have a few special photos of family and friends held captive in your phone? Or yellowed, odd-shaped sentimental photos of generations past in boxes collecting dust?

Professional framing is costly. And buying matting can be frustrating in the time and money trying to find the color or size you want. 

​
So here's a quick, easy DIY method for creating customized, clever matting for displaying those special memories sparking fun conversations.

Matting provides a resting place for the eyes and creates a visually pleasing separation between photo and its surroundings. It highlights subtle visual elements within a photo. It can also create a themed gallery of photos telling a story of a place, time, or group of people.

This tutorial shares my easy, step-by-step unique matting and framing ideas for creating one-of-a-kind memory art.  
Picture
This post is not only for *framing photos displayed on your wall or nightstand but also for those displayed in *digital photo albums and *digital photo frames... as well as for *scrapbooking pages. 
* When you buy something using affiliate links from this posts, we may earn an affiliate commission at no additional cost to you. Note: We only establish affiliate relationships and recommend products and services that we would actually use.

Estimated Time to Complete

Once you have the items needed (which we’ll get to in a moment), easily under 20 minutes.
Picture
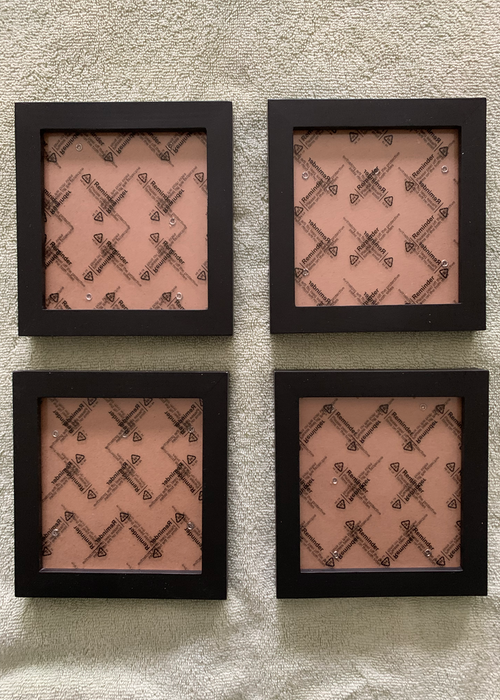
I recommend purchasing (matching) frames typically sold in sets of 4. They’re less expensive. And most projects involve multiples or grouping of “like” photos or images at a later date to build upon. 

Level of Difficulty

Easy

Estimated Cost

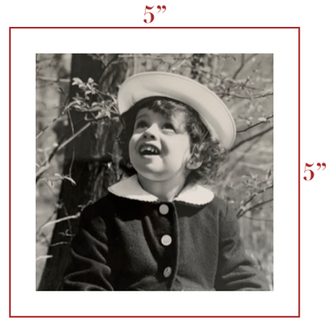
Depends on the frames you choose.  For this project, I purchased a set of four 5”x 5” frames for under $20.

Items Needed

  • Desired photo(s) to frame
  • *(Set of) picture frame(s)
  • Scanner or smart phone
  • Computer with Pages App (or apps with simple graphic design capabilities for creating a flyer)​
  • Printer
  • White paper (8.5 x 11”)
  • Scissors
Picture
Recommend choosing simple frame designs for customized matting projects.

Instructions

  • Choose photo (or photos) to frame. For this post, I pulled photos from when I was under the age of two. Although planning to frame just one photo, I pulled 4 or 5 to choose from.​
Picture
Picture
When selecting photos worthy of your valuable time and real estate on your wall, look for photos telling the most complete story capturing the moment & time the photo was taken. Considerations include
  • the activity of the subject(s)
  • the setting (of where photo was taken)... particularly if that place no longer exists
  • the ability to crop or resize the photo to accommodate the DIY matting and frame
  • Think ahead of compatible photos to display together. Again, this has to do with a type or theme of your photo(s) for future groupings. For the specific photo I’m working with in this example, I could frame additional childhood photos from when I was a youngster in Ohio. Or I could decide to frame photos of my children at a similar age for display in a guest room.
  • ​Upload your photo to your computer (or smartphone) for editing. Because I don’t have a scanner, I took a photo of the picture I used for this project and airdropped (uploaded) it from my phone to my laptop.
  • Edit photo(s) for positioning in frame(s) with DIY Matting 
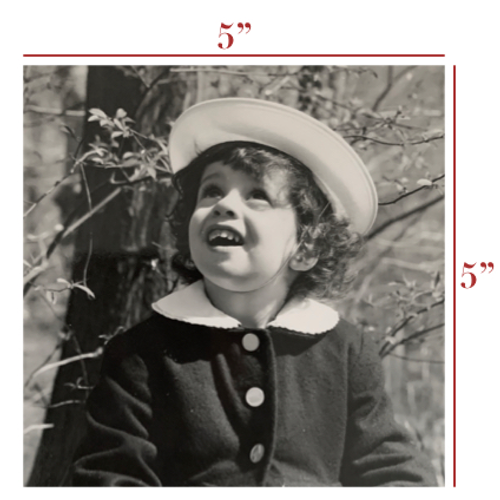
Step-by-Step instructions based on using "Pages" App on my MacBook Pro or similar apps with simple graphic design capabilities (that you could create a flyer with). 
  • Open new Pages  document choosing a blank template.
  • Drag and drop photo image in document.
  • Resize (original image of 3" x 3") to dimensions of frame opening which is 5" x 5". This includes cropping creating clean finish edges of the photo. ​
Picture
For this project, dimensions of frame opening are 5" x 5"
  • Adjust filters for brightness, tint, and coloring of photo. (For example, reducing the saturation and exposure helps rid the yellowing tint in old photos).
  • Add “shape” with no fill color and thin line border the dimensions in the frame (display) opening. For this project,  I used a 5” x 5” (red) square to serve as a guide.​​
Picture
  • Resize and position photo as you want it to appear in the frame… allowing room for image stamp. (Photo dimensions and positions can be adjusted later as you're creating your custom matting and image stamp.)​
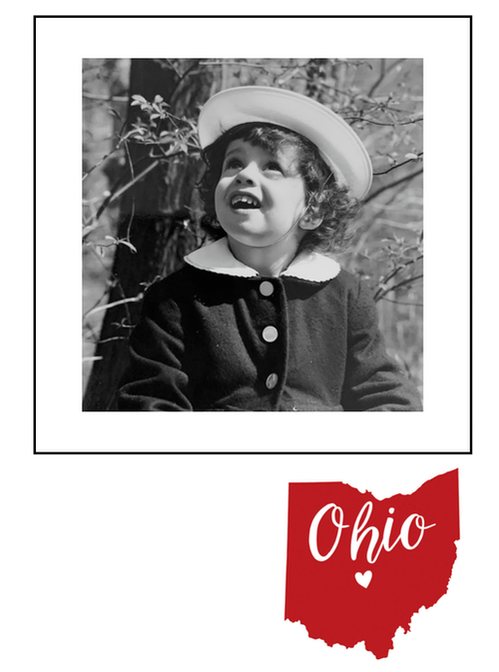
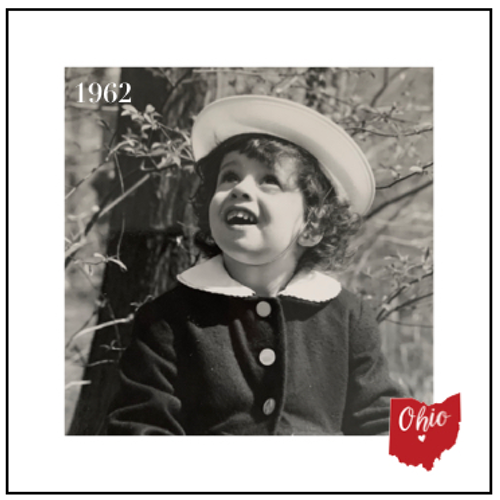
Now let's create your image stamp and personalized matting. ​The image stamp is the small image(s) appearing on the matting (or photo itself) adding to the context and story to the featured photo.
  • Select an image that adds to the story of the photo. For my example, this photo was taken in front of my first childhood home in Ohio (that no longer exists). Thus, I chose an image of the state of Ohio as my image stamp.
  • Upload this stamp image to your computer (or smartphone).
  • Drag and drop image stamp image to working page.
  • Clean up and crop (as you did with the photo).
Picture
  • Use instant alpha* to remove background elements from your stamp image. This includes those elements that you cannot see like the white background from the Ohio image place on a blue background .  
Picture
Picture
Picture
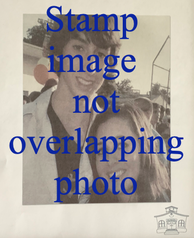
*Instant alpha is an editing tool used in Apple-friendly apps including Pages that easily removes background and creates a transparency of an image... a definite must for stamp images partially overlapping the featured photo.  For images strictly on the matting area, this step may not be needed if image background matches the printer paper AND does not overlap the photo.
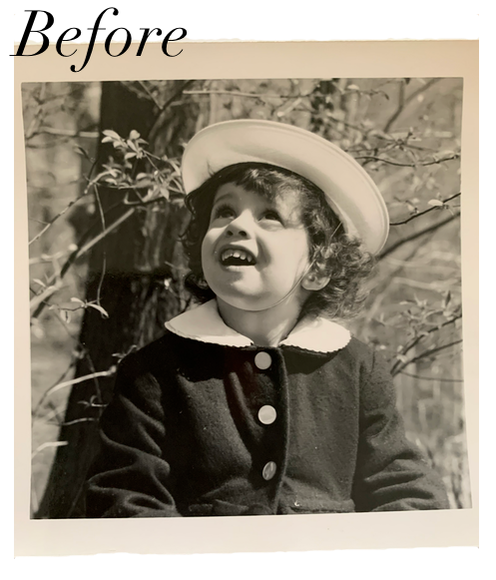
  • Position stamp image on space between guideline and photo (your new personalized matting). I overlapped part of the image stamp of the state of Ohio on my photo. Or you can place just on matting area.​
Picture
  • Optional: For a retro vibe, you  can add a subtle date stamp as I did in the upper left of the photo. 
  • Optional: Sometimes I remove outer size guide before printing.
  • Print on white paper. Note: If printed on blue paper, lighter parts of image can come out blue.
  • ​Lay glass over photo (and DIY matting) and mark trim lines (if removed frame opening size guide).
  • Trim to display size.
  • Insert in frame.
  • ​Display and enjoy.

After

Picture
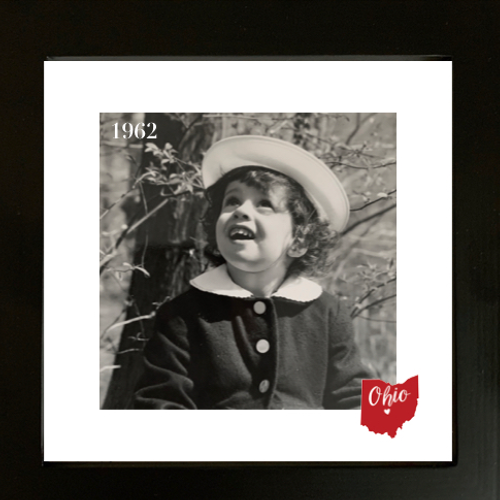
So give it a try. Also check out my other easy wall art and decor ideas at little to no cost in under an hour. In the meantime, get started and get going putting the fun back into functional stylish living… in under an hour!

Having Trouble Getting Started?

I used to feel the same way too. After all, who wants to put time into a project that may not work in their specific home? That's why I created this Quick DIY Check Prep (List) for getting you started on those projects that actually enhance your home. I use this when starting any home DIY endeavor... big or small. 

Knowing the "whys" of your home projects not only helps you with the "hows" but keeps you focused on the DIY endeavors that will matter for you... saving you time and money.
​
    Built with ConvertKit
    0 Comments

    Your comment will be posted after it is approved.


    Leave a Reply.

      Picture

      Terri Justina

      The Under-an-Hour, Home DIY Warrior

      ​Ms. Buttons and I share our quick and easy home improvement ideas bringing the fun to functional stylish living. 

      Categories

      All
      Car Care Accessories
      FREE Home DIY Projects
      Furniture DIY
      Home Dog
      Organization Ideas
      Outdoor Living DIY
      Small Dog Living
      Wall Art & Decor

    Policies & Disclaimers
    COPYRIGHT© · 2023 ALL RIGHTS RESERVED 
    Picture
    Picture
    • Home
      • About
      • Contact
    • EZ Wall Art & Decor
    • EZ Organization
    • EZ Furniture Makeovers
    • EZ Outdoor Living
    • FREE Home DIY
    • EZ Dog Home DIY
    • Blog