Home DIY Projects in Under an Hour... That You Can Be Proud Of
  • Home
    • About
    • Contact
  • EZ Wall Art & Decor
  • EZ Organization
  • EZ Furniture Makeovers
  • EZ Outdoor Living
  • FREE Home DIY
  • EZ Dog Home DIY
  • Blog

Dining Room Chair Makeover DIY in Under 1 Hour (for a set of 6!)

6/7/2023

0 Comments

 
Picture
Modernize antique chairs without taking away their unique details and charm.

​Here is a simple dining chair makeover DIY including dining room chair upholstery fabric recommendations for professional results you’re proud of.


​(Six chairs in under 1 hour!)
At the time I did this project, I put on a 1 hour tv show as I cut the fabric, attached it to the seat pads, and installed new dining room seat cushions on six chairs.  The key was keeping the process effective, quick, and simple. Sometimes less IS more.​

Estimated Time to Complete

Once you have the items needed (which we’ll get to in a moment),… easily under 1 hour for 6 dining chairs. 

Level of Difficulty

Easy!

Estimated Cost

  • Fabric for cushions which you can purchase for as little as under $10 per yard up to realistically $50 per yard (at 45 to 57 inches wide). You can further reduce your cost with store coupons for your local fabric store.
  • If you don’t already have a Heavy Duty, 3-in-1 Upholstery Staple Gun (which comes with staples). This run under $20 including sales tax. And it's an investment tool for use on future projects.​

Items Needed

  • Chairs
  • Fabric for chair cushions  
  • Scissors
  • Ruler
  • Upholstery Staple Gun (most include staples)
  • Upholstery Staples (3/8 or 1/2 inch depending on the fabric and thickness of layers)
Picture
Fabric Choice Considerations
​Consideration for fabric choices 
depend on amount of intended use for durability and ease to clean. For a project  where the dining room chairs are more for special occasions, my mommy used a polyester/ rayon blend. For dining (or kitchen) chairs for everyday or even weekly use, leather or vinyl works well for easier cleaning.  Fabrics we don’t recommend include velvet or suede which are more difficult to clean and attract dust when not in regular use. 

Instructions (for each chair)

  • Remove seat cushion from chair.
  • See what you can salvage… because the less removed of the original seat, the more you protect the original structure of the cushion… particularly on antique chairs... and less time required for the makeover. 
Picture
Picture
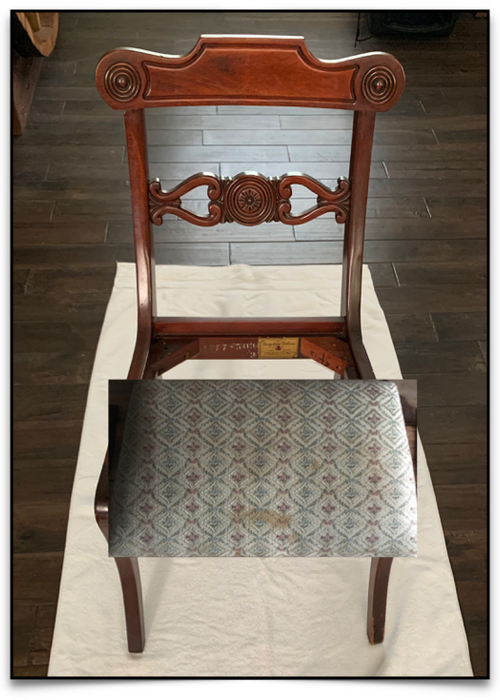
If your chair required painting or staining, then do that after seat cushions are removed and ensure all is dried and set before reinstalling refurbished seat cushions. Keep in mind that although the level of difficulty remains easy, your project will probably require more than 1 hour.
  • Lay out fabric to ensure design appears as you want on the seat. Typically I like the design to read from the top (or widest part of the chair seat) to the smallest as in my example.​​
  • Cut fabric to size of seat PLUS an additional 3.5 inches in diameter.
Picture
Picture
  • Center seat in fabric ensuring decorative side of fabric is exposed when seat cushion is installed in chair frame.
  • (On underside of seat cushion…) Staple diagonal corners first, stretching fabric taut and tight.
  • Staple two remaining corners, again stretching fabric taut and tight to ensure fabric is smooth and without wrinkles or slack.
  • Continue stapling and securing fabric around perimeter of seat cushion about 1 but no more that 1.5 inches apart.
  • Clean up and flatten corners (so cushion fits in chair frame) by a trimming and with a couple extra staples. 
  • Trim remaining excess fabric on underbelly of seat so it doesn’t hang down​.

  • Reinstall seat cushion in chair (frame)​
Picture
  • Enjoy. 
Picture
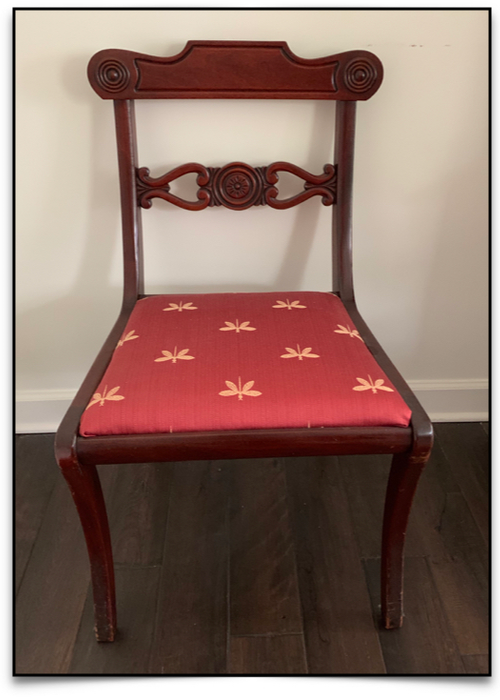
Completed refurbishes set of dining chairs ready for hosting that next dinner or game night.
​So give it a try with your favorite photos. Also check out my other easy DIY furniture makeovers at little cost in under an hour. In the meantime, get started and get going putting the fun back into functional stylish living… in under an hour!

Having Trouble Getting Started?

I used to feel the same way too. After all, who wants to put time into a project that may not work in their specific home? That's why I created this Quick DIY Check Prep (List) for getting you started on those projects that actually enhance your home. I use this when starting any home DIY endeavor... big or small. 

​
Knowing the "whys" of your home projects not only helps you with the "hows" but keeps you focused on the DIY endeavors that will matter for you... saving you time and money.
    Built with ConvertKit
    0 Comments

    Your comment will be posted after it is approved.


    Leave a Reply.

      Picture

      Terri Justina

      The Under-an-Hour, Home DIY Warrior

      ​Ms. Buttons and I share our quick and easy home improvement ideas bringing the fun to functional stylish living. 

      Categories

      All
      Car Care Accessories
      FREE Home DIY Projects
      Furniture DIY
      Home Dog
      Organization Ideas
      Outdoor Living DIY
      Pest Control & Repellents
      Small Dog Living
      Wall Art & Decor

    Policies & Disclaimers
    COPYRIGHT© · 2023 - 2025 ALL RIGHTS RESERVED 
    Picture
    Picture
    • Home
      • About
      • Contact
    • EZ Wall Art & Decor
    • EZ Organization
    • EZ Furniture Makeovers
    • EZ Outdoor Living
    • FREE Home DIY
    • EZ Dog Home DIY
    • Blog